Samsung DexTop – Introducing The Samsung Dex Based Laptop
While watching the Samsung Note 8 Announcement last month, I felt that Samsung really missed the mark when it came to promoting Dex from a cool gimmick to a truly useful tool. I have owned a Dex Dock since it was released and I can really see how well it shows off the real power of the Galaxy 8 line of phones and Android as whole. I really wish that Samsung announced a Motorola Atrix style Laptop Dock for Dex along with the Note 8. Rather than take to the Twitterverse and complain, I decided to use my imagination and maker skills and do something about it. This is the first in a series of posts that I will make on this website to document the steps I am taking to build this DexTop. I will be publishing all of the steps needed and even the STL files for 3D printing as soon as I have everything done so you can build your own.
Disclaimer: This Page Has Been Archived
Please note that this blog post has been archived and may contain information that is outdated, defunct, or covers topics that are no longer of interest. It is being kept available solely for reference purposes, in case others might find portions of it useful.
For more recent and up-to-date tutorials, I recommend visiting KMyers.me or other websites that specialize in the topic you are interested in. It is always advisable to seek the most current information to ensure accuracy and relevance.
If you are following me on Google Plus or Facebook, you may have noticed that I posted a cryptic post showing the board I removed from a Samsung Dex Dock a few weeks ago. I posted it with no context aside from a statement saying “this photo will mean more in a few weeks”. This was actually just one part of a few items I ordered from Amazon. The full shopping list was as follows
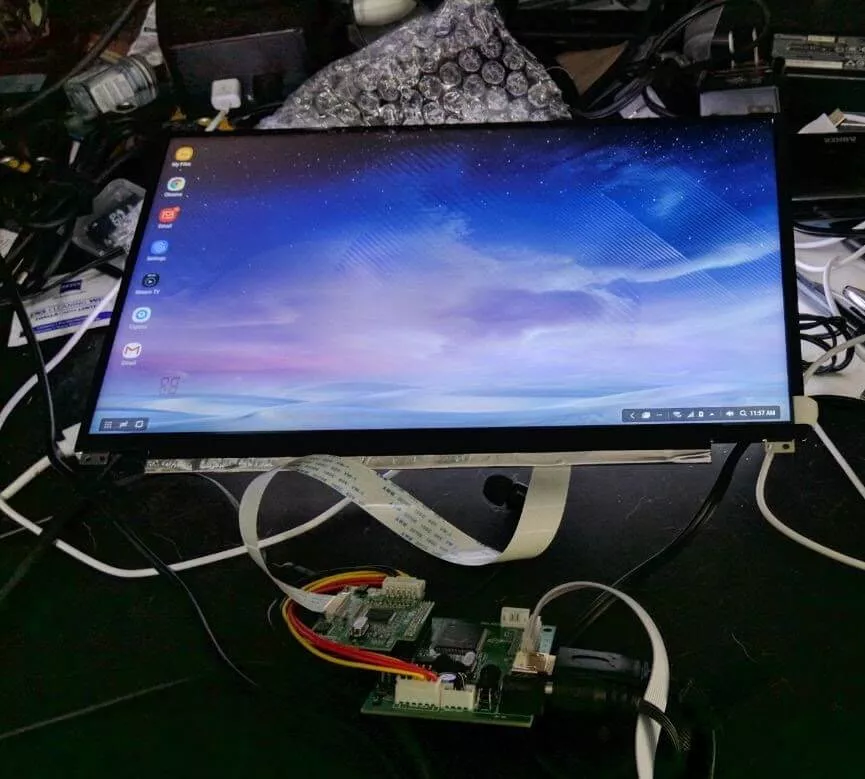
- 13.3 inch 8 Bit Display Screen 1920×1080 IPS 1080P Suitable For Car Raspberry Pi 3 Game PS4 Monitor($96.00)- Note: This item took the longest to arrive, almost 4 weeks from the time I ordered it.
- Samsung DeX Station, Desktop Experience for Samsung Galaxy Note8 , Galaxy S8 and Galaxy S8+, W/ AFC USB-C Wall Charger (US Version with Warranty)
- URBESTAC 250V 5A SPDT 1NO 1NC Momentary Hinge Roller Lever Micro Switches 3 Pins 10 Pcs
- 4 pack Battery Holder,SACKORANGE 18650 Battery Storage Case Plastic Box Holder Leads With 4 Slots for 6″ Wire Leads
- EBL Fast Lithium Battery Charger with 3.7V 3000mAh 18650 Li-ion Rechargeable Batteries, 4 Pack
- DROK 090605 DC-DC Buck Voltage Converter 8-22V 12V to 5V/3A USB charger Step
- Tablet Keyboard, Jelly Comb Ultra Slim Wired Keyboard with Touchpad for Surface Pro 2017 / Pro 4 / Pro 3, Laptop, Android Phone Tablet, Samsung etc, Leather Cover, Black
Most of the items on the list with the exception of the Dex Dock and LCD are fairly inexpensive. The total cost of this build will be around $300-$350. It is worth noting that there are a few items that are not listed above that I already had at home. This includes various wires, PLA filament, 3D printers, USB cables, solder, shrink tube, calipers, screws, and more.
Once I received the display panel (and power returned to my block after Hurricane Irma), I began taking measurements for the display and crafted a display enclosure to both protect the delicate panel and serve as a reference point to build the laptop around. I did all of the CAD work in TinkerCad and had to print the full enclosure and front bezels in a total of 4 pieces (2 pieces for each part). After several hours of printing and epoxying, I managed to get a pretty nice looking display enclosure crafted that fits the display perfectly.

Stay tuned for part 2 of this build (the base enclosure)