DexOnLinux/DexOnChromeOS – How To (NO ROOT)
Samsung announced a new feature with the Samsung Galaxy Note 10, the ability to access Samsung Dex on a Windows or MacOS device. This in my opinion was a game changer as it could allow users to use the insane power of their Galaxy Note 10/Note 10+ devices on inexpensive hardware. Samsung released a client for MacOS and Windows but as usual left us ChromeOS/Linux users out in the cold. It turns out that there is indeed a way to use Samsung Dex on Linux and X64 Chromebooks like the Pixelbook (Affiliate Link), Pixelbook Go (Affiliate Link) or even Samsung’s own line of Chromebooks, It does need a bit of inexpensive hardware and WiFi to setup .
What Works/Does Not Work
Works
- Keyboard/Mouse
- Shared Clipboard
- Drag and Drop installation of APK files
Does Not Work
- Sound routing (Sound stays on your phone or bluetooth headphones, if you have a 3.5 mm headphone jack on your USB-C dock, you can use it)
- Right Clicking (You can connect a mouse to your phone if this is a must)
The Hardware
In order to setup DexOnLinux, you will need some hardware.
- A USB-C to HDMI Dock (Affiliate Link) – This will be used to charge your Phone, expose some USB ports and the HDMI Port
- A HDMI “Dummy” Terminator (Affiliate Link)
- A USB Cable (Affiliate Link) to connect your phone to your PC
- A fast LAN/WiFi Connection (802.11 ac or better). Your phone and machine should be on the same network. Ethernet will also work if your USB-C Dock has a Ethernet Port
- A USB Power Brick (the one that came with your phone is fine)
- A x86_64 computer or Chromebook – You will need ~4 GB of space
The Software
The software setup does require a few steps which will be outlined below. These instructions assume you are using Ubuntu or Debian however if you using a different distribution, you will need to modify the steps a bit.
Android Studio/Android SDK
Download Android Studio for your device and save it to your home directory. You can download Android Studio from https://developer.android.com/studio#downloads . This is a large download and may take some time on a slower connection. After the download is complete, you will need to install Android Studio. On ChromeOS, this can be done by running “sudo dpkg -i path-to-deb”, On Linux desktops, follow the steps here.
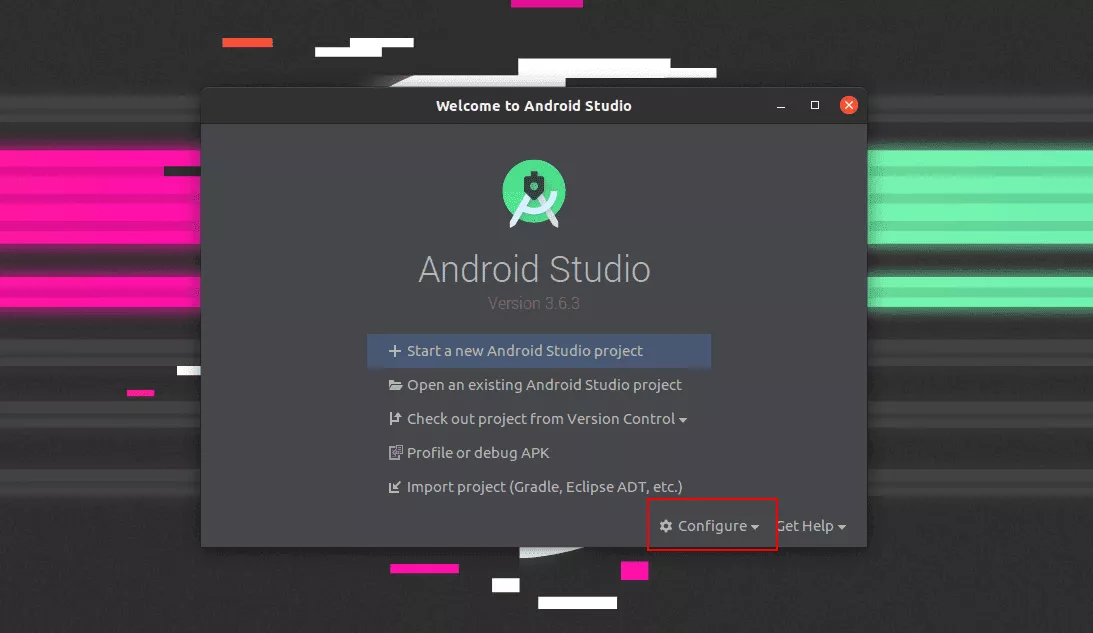
Launch Android Studio and select “configure”
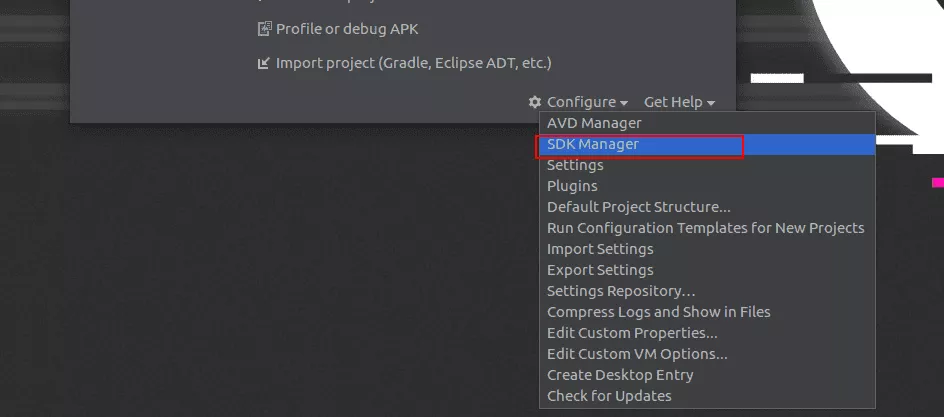
Select “SDK Manager”
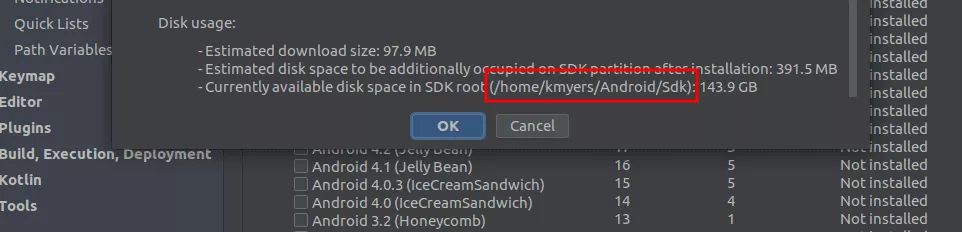
Select “Android 9.0 (Pie)” and “Apply”. Make note of the “SDK Root” before selecting “Ok”. You will be presented with the licenses for the SDK
Additional Dependencies
Run the following commands at a terminal to install the additional dependencies.
sudo apt install -y ffmpeg libsdl2-2.0-0 adb
sudo apt install -y gcc git pkg-config meson ninja-build libavcodec-dev libavformat-dev libavutil-dev libsdl2-dev
sudo apt install -y openjdk-8-jdk
Scrcpy
We will be using a amazing open source tool called Scrcpy to control our phone, unfortunately the versions of this tool in the apt repo is outdated, we will need to build it from source. This is a simple process, just run the following commands. You may need to modify the line that says “export ANDROID_HOME=” to point to the “SDK Root” path I asked you to note when installing the Android SDK
mkdir -p ~/tmp
cd ~/tmp
git clone [https://github.com/Genymobile/scrcpy](https://github.com/Genymobile/scrcpy)
cd scrcpy
export ANDROID\_HOME=~/Android/Sdk/
meson x --buildtype release --strip -Db\_lto=true
ninja -Cx
sudo ninja -Cx install
Developer Mode/ADB Debugging/Wireless ADB
You will now need to enable USB Debugging on your phone.
- Open the Android Settings
- Select “About Phone”
- Select “Software Version”
- Tap 7 times on “Build Number” and agree to enabling developer mode settings
- Re-Launch the Android Settings and select “Developer Options”
- Toggle “USB Debigging”
- Connect your directly to your computer and run “adb shell”, You should see a permissions prompt appear on your phone. If you are using a ChromeOS device, you will need to accept the prompt to pass the phone over to Linux before running the ADB command
- You should see a prompt similar to “d2q:/ $”
- Type exit to return back to a bash shell
- Run the command “adb tcpip 5555”
- Unplug your phone
- Find the LAN IP Address of your phone
- On your computer, run “adb connect IPADDRESS:5555” and hit enter
Note, you will need to re-do steps 9-12 each time you wish to use Dex on Linux
Start Screen Mirroring
- Connect the Dummy HDMI Dummy Terminator to the HDMI port on the USB-C dock
- Connect your phone to the USB-C Dock
- Connect your USB-C Dock to a power source
Run the following command on your computer to activate Dex
/usr/local/bin/scrcpy --display 2 --bit-rate 32M --window-title 'DexOnLinux' --turn-screen-off --stay-awake